Refinishing an old dresser with latex wall paint (DIY)
- The Ruthless Maker
- Feb 8
- 4 min read
My 11 year old son has been asking for his own room for the last year. He has had his eye on the guest room in our basement. I finally found time to transform the guest room into a boy inspired oasis. I thought he would be so excited to move in right away, but after two months of not, I realized he probably didn’t feel like it was his room yet since all his clothes were still in his old room he shared with his brother.
In order to move his clothes down to the room, I needed somewhere to store them. I went to Homesense and found a gorgeous wood dresser. It was $699! I didn’t want to spend that much on a dresser so I decided to do an inventory of what I had in my house. In the room my younger son and daughter share, I had an old painted dresser that was the perfect size. After a game of musical dressers, moving Noah’s old dresser into Sam and Abby’s room, and then Sam and Abby’s dresser down to Noah’s room, I was finally ready to tackle my first furniture glow up. In all the excitement, I forgot to take a before picture of the dresser, but I think you can get the just of where we started from some of these pictures.
To keep things matching with Noah’s new room, I decided to repaint this old dresser to match the accent wall color in his new room makeover. Benjamin Moore Blue Note, matte finish. Since I already had the dresser, the paint and the existing hardware, this is how to refinish a dresser for free.
What you will need:
an old dresser to redo
Sanding sponge - with different grit ranging from 220-400, depending on how rough a shape your dresser is in.
Shellac BIN primer - this is important it’s this specific primer, especially if you are painting ikea furniture
Paint brush for edging and tight spaces
Latex paint - use any you have on hand
Polyurethane finish (top coat for durability)
Here are the steps to refinish a vintage dresser using leftover latex wall paint:
Take out the drawers and set aside
Remove any hardware (knobs, handles, etc.), set them aside

if your dresser is pretty smooth and in good shape, using a sanding block, scuff up all the surfaces on the dresser frame and the front (visible part of the drawer) prior to applying primer. If it’s in rougher shape, smooth it out with an orbital sander, starting with a lower grit sand paper and moving up to a smoother grit. (For example, start with 100grit, and work up to 220grit)
Use a tack cloth to remove any dust and debris from the dresser
Prime the dresser with a BIN Shellac primer. The shellac based primer will give your paint something to stick to. I applied this with a roller and a brush to get into the corners.
Once dry, sand again with a sanding block and remove any debris with a tack cloth. Now you are ready to Take out the drawers and set aside

Smooth the primed surface with a sanding block 
Use a tact cloth to remove any sanding dust from the surface I used leftover latex paint from my son, Noah’s room. You could use a paint that is specific for cabinets and furniture too. The benefit would be that it tries very hard and durable and you could probably skip the step of adding a polycrylic afterwards. Using a 5mm roller and a woosters shorty brush, I painted the dresser. Put your roller and brush into a ziplock bag and put it in the fridge so they are ready for the second coat.

After it’s dry , 24 hrs, lightly sand til smooth. Remove any dust with a tack cloth
Apply your second coat of paint and let dry. If you are using a specific cabinet paint, this could be your last step. If you just used a latex paint like me, I’d recommend adding a couple coats of poly to make your dresser more durable.
Before adding the poly, give your surface another light sand using a superfine or microfine grit sand sponge. Remove any dust with a tack cloth.
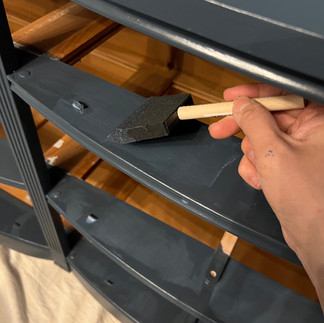
To apply the poly, stir it up in the can and use a foam roller and a foam brush to apply. Apply a light coat and try not to roll over areas too much or you’ll get streaks. Let dry.
Once your first coat of poly is dry (24 hrs) sand lightly using a microfine sand sponge. I actually had a lot of streaks after my first coat so I used a 320 grit, then a 400 grit, then super fine and then microfine sand sponge, in that order to get to the smoothest possible surface.
Apply the second coat of poly. Use a new foam roller and foam brush for the best finish. Let dry. I was nervous that there would be streaks still after the second coat but it all dried really smooth.


I am so pleased with how this dresser makeover turned out, how I was able to turn something old into something beautiful, and that I could use all materials that I had around the house. This was a cost effective storage sol
Comments